
Advanced Airways
last authored: Nov 2013, David LaPierre
last reviewed: Nov 2015, Kevin Barry
Introduction
Advanced airways include endotracheal tubes, laryngeal mask airways, and other tools that are used to maintain a patient's airway and provide ventilation. Endotracheal intubation (referred from this point as simply intubation) involves the placement of a flexible tube into the trachea. As this is the most frequently used advanced airway, during surgery and resuscitation, it is the primary focus of this topic. However, other 'rescue' tools are also described, given their importance.
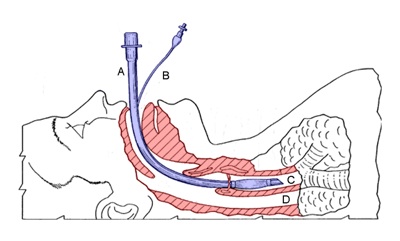
Endotracheal tube in place, used with permission
Intubation is one of the highest acuity components of airway management. It is also potentially a very dangerous invasive procedure that requires a great deal of clinical experience to master. When performed improperly (e.g., unrecognized esophageal intubation), the associated complications may rapidly lead to the patient's death.
Despite these concerns, endotracheal intubation is still the gold standard in airway care and provides the highest level of protection against aspiration of vomit, secretions, blood, or other materials.
Indications and Contraindications
- indications
- contraindications
Indications
Entotracheal intubation is used:
- before surgery using general anesthetic
- during respiratory failure (various causes)
- during cardiac arrest
- in situations of airway obstruction: including burns, edema, trauma, infection
- during other states where ventilatory support is needed
- in situations where there will be future need of intubation
Intubation maintains an open airway, allows ventilation, eliminates or assists the work of breathing, prevents aspiration, facilitates suction, and allows administration of medication during cardiac arrest.
Contrainications
The only absolute contraindication to endotracheal intubation is a do-not-resuscitate desire of a patient who would otherwise be resuscitated.
Relative contraindications include:
- inability to extend the head: severe arthritis or spinal degeneration
- severe trauma to the cervical spine or anterior neck
- epiglottal infection
- mandibular fracture
- uncontrolled oropharyngeal hemorrhage
In these conditions, ask for expert help as available, consider rescue techniques, described below, or cricothyroidotomy.
Assessing the Patient and Predicting Ease of Intubation
If not yet done, perform a brief history:
- Allergies
- Medications
- Past Medical History
- Last Meal
- Events
If not yet done, perform a brief physical exam, including vital signs, chest auscultation, and fluid status.
LEMON
- Look
- Evaluate
- Mallampati
- Obstruction
- Neck
LEMON is a helpful acronym to guide prediction of ease of intubation:
Look for evidence of potential difficulty:
- face shape
- buck teeth
- face or neck pathology
Evaluate airway spaces using the 3,3,2 rule:
- three of the patient's fingers should be able to fit into his/her mouth when open
- three fingers should comfortably fit between the chin and the hyoid bone
- two fingers between the floor of the mouth (hyoid) and the thyroid cartilage
Mallampati class: Ask the patient to widely open their mouth. Class IV is associated with more difficult intubations.
- class I: total uvula visible
- class II: partial uvula visible
- class III: only top of uvula visible
- class IV: no uvula present
Obstruction: is there a history or evidence of airway obstruction?
- secretions, blood, broken teeth, etc
- unfasted state
- airway burns
- anaphylaxis
- facial or neck trauma
- morbid obesity
- stridorous breath sounds
- wheezing
Neck mobility: can the patient tilt the head back and then forward to touch chest? DO NOT ATTEMPT this if there is suspicion of cervical trauma.
A thorough assessment will assist in predicting difficulty of intubation. If necessary, and as available, ask for help if significant challenges are expected. Always ensure a difficulty airway kit is available.
Emergency airway management can also be made much more challenging by a stressful environment or little time for preparation.
Preparation
Preparation is essential. Have a colleague present to assist. Obtain informed consent if possible. Ensure IV access to provide medications and fluids.
Preparing for advanced airway: SOAP-ME
- suction
- oxygen
- airway equipment
- pharmacology
- monitoring equipment
Select and check all equipment.
- check suction
- laryngoscope light
- inflate balloon and check for leaks
- lubricate ETT tip and spray lidocaine on outside and inside
Ensure monitors are in place for the following:
- blood pressure
- pulse oximetry
- cardiac monitor
- end-tidal CO2, if available
Observe univeral precautions and clean technique. Ensure you and your team are effectively protected with mask, safety glasses, and face shield as warranted.
Pre-oxygenate with 100% oxygen using a facemask. Ensure a pulse oximeter is on.
Positioning
Place patient on back, with head tilted back in the 'sniffing' position if no spinal injury is suspected. Endeavour to have the oral, pharyngeal, and laryngeal airways all aligned to 180 degrees as much as possible.
Remove dentures. Place a pillow under the head, bringing ear to the level of the sternum. Keep the sternum parallel with the floor.
Medications
main article: procedural sedation and paralysis
In general, prior to intubation, the patient will need to be rendered unconscious and paralyzed to permit insertion of the airway. The patient may already be unconscious, however, making this step unnecessary. There are a select few cases where patients will be left awake before intubation, but these are rare.
Premedication is often used to reduce secretions and the risk of bradycardia.
NOTE: Before proceeding with paralysis, ensure you are able to ventilate the patient using a BVM. However, avoid overzealous positive pressure ventilation, which increases aspiration risk and doesn't appear to increase duration of apnea without desaturation.
Endotracheal Intubation
- Equipment Required
- Placing the Tube
- Confirming Placement
Equipment Required
Endotracheal tube
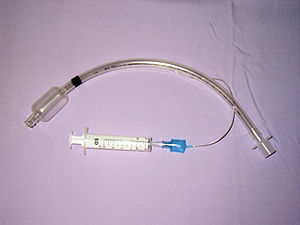
Inflated endotracheal tube, used with permission
Endotracheal tubes are available in various sizes, the larger equipped with inflatable cuffing to seal the tube against the tracheal wall. Use as large a tube as possible. A good rule of finger is to choose tube size according to the patient's pinkie diameter.
- neonates and full-term infants: no 0 and 1
- pediatrics: interior diameter = (age in years/4) +4
- adult women: 7-8 mm (based on size)
- adult men: 7-8.5 mm (based on size)
Confirm the length before placement. The tube should extend from the mouth to beyond the sternal notch.
Blades
The rigid laryngoscope is designed to lift the tongue and epiglottis, allowing visualization of the vocal cords.
Blades come in different shapes and sizes. The straight Miller blade is useful for children and in situations where the patient has a large epiglottis, as it is designed to lift this structure. Blade sizes are normally 2 or 3 for adults.
The curved MacIntosh blade works best in adults, especially those with obesity. Blade size can be estimated by measuring the length from the patient's lips to the angle of the mandible; blade sizes are normally 3 or 4.
Other Equipment includes:
- gloves, mask, protective eye wear
- oxygen supply and tubing
- bag valve mask apparatus
- selection of oral airways to facilitate BVM
- laryngoscope handle, plus a spare
- rigid suction catheter, Yankauer, 10-12 French
- tracheal suction catheter
- stethoscope
- 10 cc syringe (to inflate cuff)
- flexible intubating stylette
- clock
- pulse oximeter
- cardiac monitor and defibrillator
- CO2 detector
- Magill forceps (to remove foreign material)
- water soluble lubricant
- lidocaine jelly and spray
- 3 ft Twill Tape - for securing ET to patient
- scissors
- rescue devices (eg bougie, LMAs, glidescope, lightwand)
Placing the Tube
Filmed at the Dalhousie Learning Resource Centre.
With the head in the sniffing position, use a chin lift and jaw thrust.
Stand behind the patient's head, and ensure the height is comfortable.
If desired, a malleable stylet may be used to provide form to the ETT. Ensure the inside of tube is lubricated to facilitate stylet removal. Insert the stylet, ensuring it does not reach the end of the tube.
Begin a 20 second count. It can be helpful for the operator to hold their breath during intubation attempts; if they need to breath, the patient does also, and attempts should be paused as the patient is re-oxygenated.
Remove oxygen mask and open the mouth.
Hold the laryngoscope in the left hand and turn it on by flipping down the blade. Open the mouth with the fingers of the right hand. If using a straight (Miller) blade, insert on the right side of the tongue and push the tongue to the left. If using a curved blade, insert in the center of the mouth.
Push the blade posteriorly until the tongue is no longer visible. Use the right hand to protect the lower lip.
Once you are past the tongue, and the teeth and lips are clear, lift the laryngoscope forwards and upwards. A 30-45 degree angle is ideal; this is normally towards the point where the wall across the room meets the ceiling. Avoid levering backwards, ie do not using biceps flexion. Again, avoid contact with both upper and lower teeth.
Visualize the vocal cords.
If this is not possible, as an assistant to perform the Sellick maneuver, in which the thumb and index finger are used to provide cricoid pressure that is BURP - backwards, upwards, rightwards. Use approx 1 kg of pressure. However, note cricoid pressure can make ventilation or intubation more difficult, and many clinicians discourage its use.
Use suction or McGill forceps to remove secretions or material, as required.
Without taking your eyes off the cords, gently pass the endotracheal tube between vocal cords, advancing the cuff completely through and 2-3 cm beyond the cords. The tube should rest just above the carina (area of airway bifurcation), or approx 23 cm from the mouth in men and 21 cm in women. For children, this can be estimated as (age in years/2) +12.
Keep holding the ET tube and withdraw the blade. Stabilize against the patient's face. Remove the stylet if you have used it.
Inflate the cuff with 10-20 cc of air. Avoid overfilling, as evidenced by increased resistance in the syringe, as the pressure can cause tracheal damage. Insufficient filling will leave tracheal breath sounds on auscultation; minimal occulding volume is desired to cause these breath sounds to cease.
Ventilate through the tube. Look for signs of correct placement (described in next section).
If unsucessful within 20-30 seconds, remove laryngoscope and re-oxygenate patient before continuing. After three attempts, if unsuccessful, seek expert assistance if available.
Confirming Placement
NOTE: Maintain the ETT position manually until placement is confirmed and the tube is secured.
Do 5 point ausculation, first over the epigastrium and then twice over each lung while ventilating. Bubbling sounds over the epigastrium suggests esophageal intubation - deflate cuff and repeat intubation.
If breath sounds are heard more clearly in one lung, mainstem bronchus intubation is likely. Deflate cuff, withdraw ETT by 1-2 cm, reinflate, and reassess.
Airway intubation normally results in misting within the tube during expiration.
A colorimetric CO2 meter should be applied to the ETT, with colour change observed. To assist in remembering: Gold is good; yellow is yes.
If available, end-tidal CO2 capnography should be used.
Once placement is satisfactory, secure tube with twill tape and continue ventilating. Note and document the depth of tube placement by recording the markings at the tooth line.
Confirm ETT placement with chest X ray when appropriate.
Laryngeal Mask Airways
A laryngeal mask airway (LMA) is a suitable alternative to an endotracheal tube, and has the advantage of requiring a lower level of training that an ET tube.
However, it does not protect the airway, and therefore is associated with an increased risk of aspiration. Also, higher pressures of ventilation are not possible, given the lack of tight seal that is obtained. This makes it less helpful in obese patients or others with increased chest wall resistance.
The tip of the LMA is advanced to the esophageal sphincter. The cuff is inflated to create a seal above the larynx, rather than in it.
Difficult or Failed Intubations
Difficult airways include both difficulty with bag-valve-mask ventilation and difficulty with intubation by a skilled operator. Difficult airways suggest a high risk of morbidity, such as hypoxic brain injury, as well as risk of mortality.
A failed airway describes a situation where the team cannot intubate and maintain sats above O2 above 90%. In these situations, rescue approaches must rapidly be applied. Do not allow your pride to interfere with safe care of the patient, and do not be afraid to ask for help or maintain basic airway support, if sufficient.
There are difficult airway intubation algorithms specific for different institutions. Some examples are seen with the ASA.
If an airway is proving challenging to secure, there are a number of options:
- attempt the Selleck maneuver, described above
- change the blade
- select more experienced personnel to intubate
- utilize one or more rescue techniques
Endotracheal introducer, or Bougie: A thin semi-rigid rod is introduced into the trachea, either blindly or with laryngoscopy. The ETT is inserted over the introducer, which is then removed.
Video laryngoscopy uses a device with a fibre-optic camera embedded within the laryngoscope blade. This allows straightforward visualization of the cords for endotracheal tube placement.
Other options include:
- jet sufflation
- lighted stylet
- Bullard
- retrograde intubation kit
- Combitube: two cuffs - one in the pharynx and one in the esophagus. Can be placed blindly
- King LT
Possible Complications
Short term complications of intubation include:
- inability to intubate
- hypotension, due to increased thoracic pressure, decreased venous return, and vagal stimulation
- hypertension
- laryngeal edema
- unrecognized esophageal intubation (will rapidly lead to death)
- trauma to lips, teeth, tongue, pharynx, larynx, esophagus, or trachea
- facial trauma due to aggressive visualization or dropped equipment
- right mainstem bronchus intubation, with lung collapse on left, and hyperinflation on right
- laryngospasm
- hypoxia
- neck trauma due to hyperextension
- increased intracranial pressure (from laryngeal stimulation)
- bradycardia or tachycardia
Longer term complications include:
- infection, especially pneumonia
- pneumothorax
- vocal cord paralysis
- tracheomalacia
- tracheoesophageal fistula
Additional Resources
American Thoracic Society - Endotracheal Intubation by Direct Laryngoscopy
Ptolemy - advanced airway in trauma and critical care
University of Virginia - Dept of Anaesthesia
Penn State - Department of Anesthesia, Difficult Airway Modules
 |